“`html
Homemade Red Velvet Cake Balls
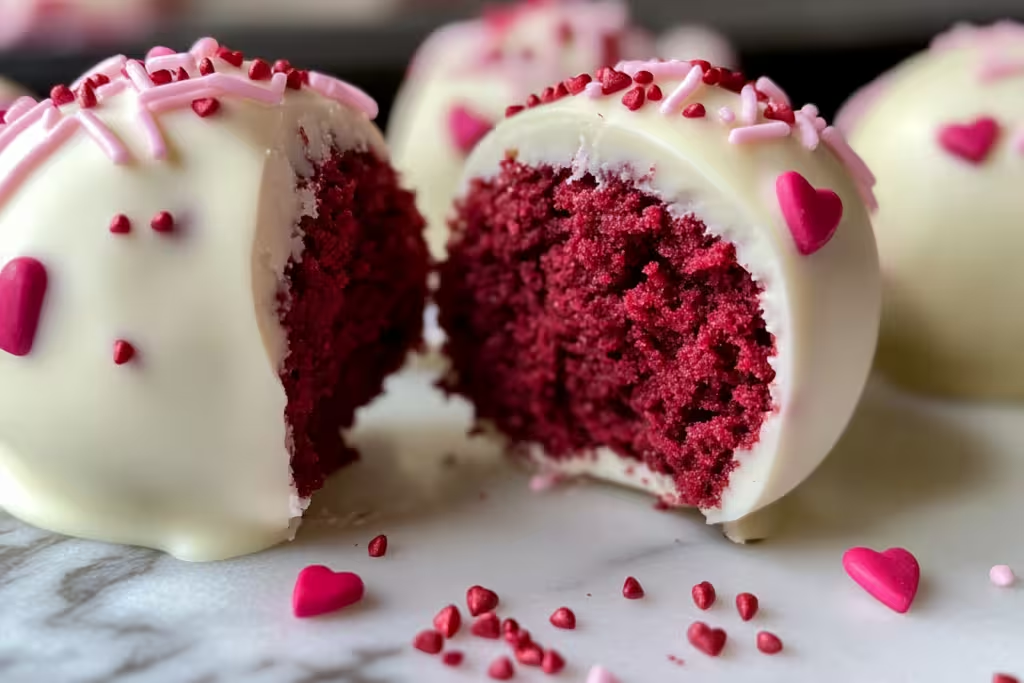
Oh, where do I even begin with my absolute love for these Red Velvet Cake Balls? It all started on a rainy Saturday afternoon, when I was in desperate need of something sweet and a little indulgent. I stumbled upon a red velvet cake mix, and thought, “Why not make something fun and bite-sized?” And thus, the magical journey of cake balls began! These little treats are not only adorable, but they also taste like a party in your mouth. Trust me, every bite is a gooey delight that transports you straight to dessert heaven.
I remember the first time I made them; I was having a small gathering, and they were an instant hit! People couldn’t get enough of the soft, moist cake wrapped in a silky white chocolate coating and pretty sprinkles. Perfect for any occasion or just because you want to treat yourself. So, let’s dive into this delightful recipe, shall we?
What’s in Homemade Red Velvet Cake Balls?
- Red Velvet Cake Mix (1 box, 15.25 oz): This is the star of the show! I personally love the Duncan Hines brand for its rich color and flavor, but any good-quality mix will do.
- Large Eggs (3): These give the cake its moistness. Make sure they’re at room temperature for the best results!
- Water (1 cup): Essential for mixing, but feel free to substitute with milk for a richer taste.
- Vegetable Oil (1/2 cup): This helps keep your cake soft and moist. You can also use canola oil if that’s what you have on hand.
- Cream Cheese Frosting (1 container, 8 oz): The secret ingredient! It binds the crumbled cake together and adds that delightful cream cheese tang.
And for the Coating…
- White Chocolate Chips (10 oz): This sweet coating is a must! Ghirardelli is my go-to brand because their chocolate melts smoothly.
- Vegetable Oil (2 tsp): Just a touch to help smooth out the chocolate for dipping.
Decoration
- Festive Pink and Red Heart Sprinkles (1/4 cup): These add a charming touch to your cake balls. Perfect for special occasions!
- Additional Red Velvet Cake Crumbs (Optional): For garnishing, it adds a beautiful touch and a little extra flavor.
Is Homemade Red Velvet Cake Balls Good for You?
Well, let’s be honest here! While these Red Velvet Cake Balls are undeniably scrumptious, they’re also a little indulgent. The cream cheese frosting adds delicious flavor and some richness, but keep in mind that, like most desserts, they should be enjoyed in moderation. The good news? Red velvet cake, being chocolate-based, contains cocoa powder which is full of antioxidants (you see, I’m trying to look at this positively!).
Just remember, they’re a treat, not a main course! If you’re looking to make this a bit healthier, you could experiment with lower-sugar frosting options or even try making a gluten-free version with almond flour. But honestly, why would you? Cherish those sweet moments!
Ingredients List
- Red Velvet Cake Mix – 1 box (15.25 oz)
- Large Eggs – 3
- Water – 1 cup
- Vegetable Oil – 1/2 cup
- Cream Cheese Frosting – 1 container (8 oz)
- White Chocolate Chips – 10 oz
- Vegetable Oil – 2 tsp (for coating)
- Festive Pink and Red Heart Sprinkles – 1/4 cup
- Additional Red Velvet Cake Crumbs – Optional
How to Make Homemade Red Velvet Cake Balls?
- Bake the Cake: Preheat your oven to 350°F (175°C). Grab a 9×13 inch baking dish and spray it with non-stick spray. In a large bowl, mix together the red velvet cake mix, eggs, water, and vegetable oil until it’s smooth and well combined. Pour all of that deliciousness into the prepared dish and bake as per the package instructions (usually around 25-30 minutes). Once done, let the cake cool completely.
- Crumble the Cake: Carefully remove the cooled cake from the baking dish and crumble it in a large mixing bowl. You want to get it into fine crumbs — no large pieces, please!
- Mix with Frosting: Add the cream cheese frosting into the bowl with the cake crumbs. Get in there with your hands and mix until everything is fully combined. It should hold together when you press it.
- Form the Cake Balls: Take about a tablespoon of the mixture and roll it into a ball. Place these little gems on a parchment-lined baking sheet. Keep rolling until you’ve used all your mixture. Pop the tray in the refrigerator for at least 1 hour so they firm up.
- Melt the Chocolate: In a microwave-safe bowl, combine the white chocolate chips and the vegetable oil. Microwave in 30-second intervals, stirring in between, until completely melted and smooth.
- Coat the Cake Balls: Remove the chilled cake balls from the refrigerator. Dip each ball into the melted chocolate using a fork, letting the excess drip off. Return the coated balls to the parchment-lined baking sheet.
- Decorate: Before the chocolate sets, sprinkle heart sprinkles on top of each cake ball. If you’re feeling extra fancy, drizzle some melted white chocolate on top!
- Chill Again: Put the decorated cake balls back in the refrigerator for about 30 minutes to let the chocolate harden.
- Serve: Once the chocolate is set, they’re ready to be devoured! Store any leftovers in an airtight container in your fridge for up to a week (if they last that long!).
Sweet Tips & Tricks!
- For a fun twist, try using colored chocolate melts instead of white chocolate — it’s a great way to match any occasion!
- Add a splash of flavoring like vanilla or almond extract to the frosting for an extra zing.
- These cake balls are awesome for parties, holidays, or just to brighten up your day. Who doesn’t need a little cake ball magic every now and then?
I hope you give these Homemade Red Velvet Cake Balls a try! They hold a special place in my dessert-loving heart, and I can guarantee they will win over anyone who gets a taste. Do let me know how your cake balls turn out and what creative spin you might add to them. Happy baking!
“`


