## Homemade Cherry Crumb Bars: A Slice of Summer Bliss
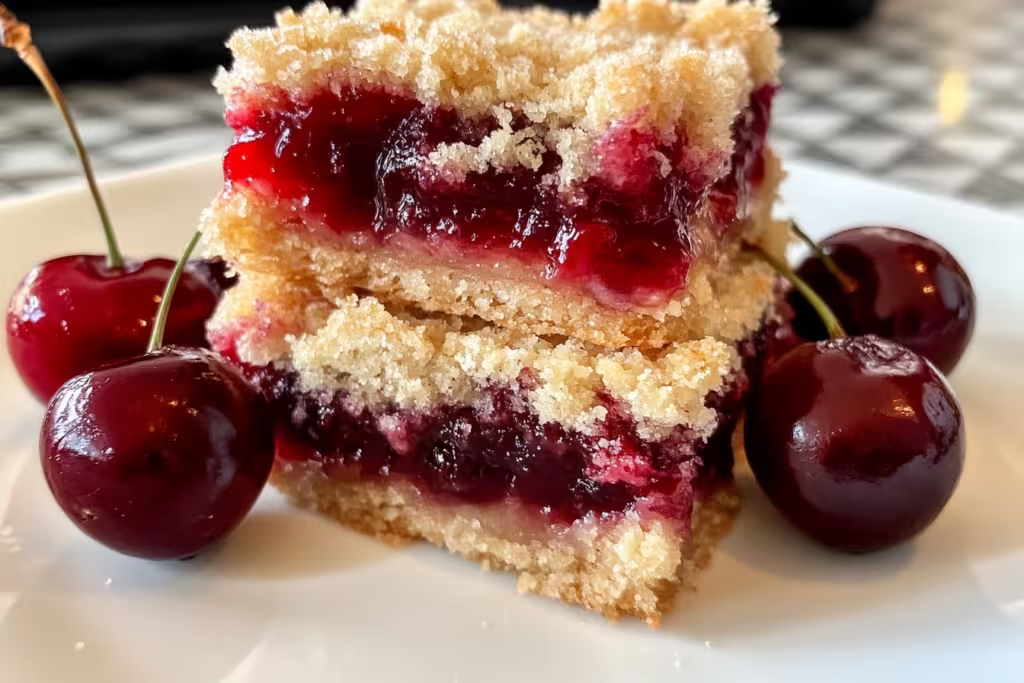
Oh, where do I even begin with these Homemade Cherry Crumb Bars? They’re like a sweet little hug in dessert form! Every time I whip up a batch, I’m reminded of summer picnics with my family, laughter echoing around, and the juices from fresh cherries staining our fingers. It’s a nostalgic experience that’s hard to beat. There’s just something about the combination of flaky crust, juicy cherry filling, and crumbly topping that makes my heart sing. So, grab your apron and let’s get started on this sweet adventure!
## What’s in Homemade Cherry Crumb Bars?
Let’s dive into the magic of ingredients that makes this dessert tick. It’s simple, but trust me, it packs a punch of flavor!
– **All-Purpose Flour (1 1/2 cups)**: This is the backbone of our crumb mixture. It gives the bars structure. For a gluten-free version, feel free to swap it out with your favorite gluten-free flour blend.
– **Granulated Sugar (1/2 cup + 1/4 cup)**: Sweetness is key! The first amount goes into the crust and topping, while the second is for the cherry filling. You can adjust it based on how sweet your cherries are.
– **Unsalted Butter (1/2 cup, softened)**: Ah, butter, the magic ingredient that creates that rich, flaky texture. If you’re feeling adventurous, try using a little coconut oil for a unique flavor twist!
– **Baking Powder (1/2 teaspoon)**: This little guy helps to give our crust a slight lift, keeping it from being too dense.
– **Salt (1/4 teaspoon)**: Just a pinch! It helps balance the sweetness and enhances all the other flavors.
– **Vanilla Extract (1/2 teaspoon)**: Because everything is better with a hint of vanilla! (You could even switch it up with almond extract if you want to get fancy!)
– **Fresh Cherries (2 cups, pitted and halved)**: The star of the show! Juicy, fresh cherries make all the difference. If cherries are out of season, feel free to use a can of cherry pie filling for convenience.
– **Lemon Juice (1 teaspoon)**: A spritz of lemon juice brightens up the filling and complements the cherries beautifully.
– **Cornstarch (1 tablespoon)**: This acts as a thickener for our cherry filling, keeping your bars from being too runny.
## Is Homemade Cherry Crumb Bars Good for You?
Now, I can’t claim these bars are health food, but there are certainly some perks to them!
1. Fresh cherries are loaded with antioxidants, vitamin C, and fiber, which are all fabulous for your health. So, at least we can say we’re indulging sensibly!
2. The whole recipe is versatile! You could easily swap out some of the granulated sugar for natural sweeteners, or use whole grain flour for extra nutrients.
3. On the flip side, watch out for portions! It’s easy to snack away on these bars. They’re tempting, so just make sure you enjoy them mindfully!
## Ingredients List
### For the crust and topping:
– **All-purpose flour: 1 1/2 cups**
– **Granulated sugar: 1/2 cup**
– **Unsalted butter: 1/2 cup, softened**
– **Baking powder: 1/2 teaspoon**
– **Salt: 1/4 teaspoon**
– **Vanilla extract: 1/2 teaspoon**
### For the cherry filling:
– **Fresh cherries: 2 cups, pitted and halved (or 1 can of cherry pie filling)**
– **Granulated sugar: 1/4 cup (adjust based on cherry sweetness)**
– **Cornstarch: 1 tablespoon**
– **Lemon juice: 1 teaspoon**
## How to Make Homemade Cherry Crumb Bars?
1. **Preheat the Oven**: Preheat your oven to 350°F (175°C). And don’t skip this step—it’s essential for getting that crust just right! Grease an 8×8 inch baking pan or line it with parchment paper for easy removal.
2. **Prepare the Crust and Topping**: In a medium bowl, mix together the flour, sugar, baking powder, and salt. Then, add in the softened butter and vanilla extract. I usually use my hands for this step because I find it easier to bring everything together and create that lovely crumbly texture. Set aside about 1 cup of this mixture for the topping.
3. **Press the Crust**: Pour the remaining crumb mixture into the prepared baking pan. Now channel your inner baker and press it firmly into an even layer to form the crust. Bake in the preheated oven for about 10-12 minutes until lightly golden.
4. **Make the Cherry Filling**: While the crust is baking, prepare your cherry filling. In a separate bowl, combine the pitted cherries, sugar, cornstarch, and lemon juice. Toss gently to coat those lovely cherries evenly; it’s like giving them a little bath!
5. **Assemble the Bars**: After pulling the crust out of the oven, pour the cherry mixture over the crust in an even layer. Then sprinkle the reserved crumb mixture on top.
6. **Bake**: Pop the pan back into the oven and bake for an additional 25-30 minutes, or until the topping is golden-brown and the cherry filling is bubbly like a summer day.
7. **Cool and Serve**: It’s torture, I know, but after you take them out of the oven, let the bars cool in the pan on a wire rack. Once cool, cut into squares and serve at room temperature. For a touch of decadence, garnish with fresh cherry halves. Wow, now that’s a party!
## Crumbly Goodness Awaits!
– For an extra flavor pop, consider mixing in a teaspoon of almond extract into the cherry filling—trust me, it’s a game changer!
– These bars are perfect for picnics or family gatherings. And they pair beautifully with a scoop of vanilla ice cream. Just picture it: the warm bars, the cold ice cream melting on top—pure bliss!
I genuinely encourage you to try your hand at making these Homemade Cherry Crumb Bars. Not only will they fill your kitchen with an irresistible aroma, but they’ll also become a cherished recipe for your memories, just like they are for me. Please drop a comment sharing your thoughts and experiences when you make them; I can’t wait to hear your stories! Happy baking! 🍒✨


